
Builder layout and the top bar
Understand the full builder layout — the three panels, every top-bar button, the save system, and how to navigate pages.
In this guide
Opening the builder
From your dashboard, find your website card and click Edit. The builder opens in a full-screen view.
If you are opening a brand-new site for the first time, you land on the onboarding screen where you describe your business — the AI builds the first version from that. After onboarding, the builder is your permanent workspace.
Three-panel layout
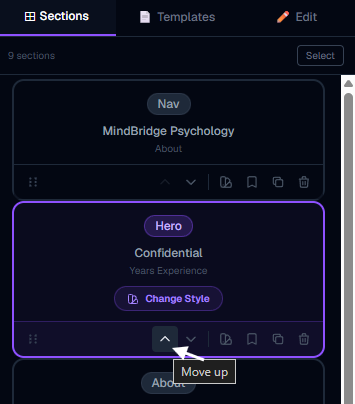
The builder is split into three areas side by side:
Left panel — your control panel. Three tabs: Sections (section list), Templates (full site templates), and Edit (content editor for the selected section). You can drag the edge of this panel to make it wider or narrower — from 200 px up to 500 px. The width is remembered the next time you open the builder.
Center/right — Live preview — your website rendered in real time. Clicking any part of the preview selects that section. Changes from the Edit tab appear here instantly as you type.
AI drawer — slides in from the right over the preview. Contains the full AI Build & Edit chat and template picker. Opens when you click the floating Build & Edit button on the preview.
Top bar — left side
The left side of the top bar contains navigation and site tools:
← Back arrow — saves your draft automatically and returns you to the dashboard. Your work is never lost by clicking back.
Site name — the business name of the website you are editing.
Page dropdown — click the current page name (e.g. "Home") to open a dropdown showing all your pages. Click any page to save the current draft and switch to that page. Each page can have its own independent draft status — pages with unsaved changes show a small amber "draft" badge.
Add page — at the bottom of the page dropdown. Enter a name and EasyWebie creates the slug automatically and navigates you to the new page.
Media button (image icon) — opens the Media Library modal where you upload images, logos, and files to use in your site.
Top bar — right side
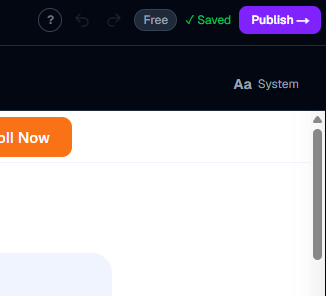
? (tour button) — a small circle with a question mark. Launches the guided builder tour — a series of tooltips that walk you through every part of the builder.
Undo / Redo arrows — undo up to 20 actions (Ctrl+Z). Redo with the right arrow (Ctrl+Y or Ctrl+Shift+Z). Grayed out when there is nothing to undo or redo. Shortcuts are disabled when your cursor is inside a text field.
Draft badge + Reset — appears when the current page has unsaved changes compared to the live site. The amber "Draft" badge is a reminder. Next to it: ↺ Reset — discards ALL draft changes on this page and reverts to the last published version. This cannot be undone.
Plan / Sonnet badge — shows your current plan and Sonnet AI usage. Free: just "Free". Basic: just "Basic". Starter: "X/10 Sonnet". Pro: "Pro · X/day Sonnet".
Save status — four possible states:
🛍️ Store — only visible on Starter and Pro plans. Links to your store product manager for this site.
Publish → — saves the current draft and opens the pre-publish flow (email verify → AI scan → Terms → deploy).
How auto-save works
EasyWebie saves your work in two layers:
Draft (automatic) — every change you make is saved to a private "draft" version of your page after 1.5 seconds of no further changes. This draft is only visible to you in the builder — not to visitors on your live site.
Published (manual) — clicking Publish pushes your draft to the live site. Until you publish, visitors still see the previous version.
This means you can safely close the browser mid-edit and come back later — your draft is waiting exactly where you left off. The dashboard card shows an "Unpublished changes" warning to remind you.
Navigating between pages without losing work
Whenever you leave the builder — by clicking Back, switching pages, or going to Publish — EasyWebie automatically flushes any pending auto-save so nothing is lost.
If the save fails at that moment (e.g. you are offline), you will see a confirmation dialog asking whether to proceed with potentially stale content or stay to fix the connection. Choose Cancel to stay and retry.
More in Builder
Managing sections — add, reorder, duplicate, delete
Everything about sections: what they are, how to add them in the right position, reorder by dragging, duplicate, delete, and change their visual style.
Editing content — the Edit tab
How to edit text, buttons, links, colors, images, icons, and every other field in the content editor.
The AI Build & Edit drawer
How the AI chat works — generating new sections, redesigning existing ones, choosing models, using reference images, and understanding AI credits.
Media library, logo, fonts, and hero images
How to upload images and logos to the media library, set your site logo, choose fonts, and set a hero background image or video.
Power features — select mode, batch redesign, templates, shortcuts
Advanced builder techniques: select multiple sections for batch AI redesign, save custom section templates, use keyboard shortcuts, and apply full-site templates.
Managing pages in your website
How to add new pages, switch between pages, navigate internal links, and delete pages you no longer need.
Using templates smartly — get more with fewer AI credits
How to build a complete, professional website using ready-made templates without spending any AI credits — then use AI only where it matters most.
Empty Section — build any custom layout with AI or your own code
How to add a blank empty section to your page and use the AI drawer or Code Editor to turn it into any layout you can imagine — no templates, no limits.
Section Creator — build and save custom HTML/CSS sections
How to write your own HTML and CSS in the Section Creator, add editable fields with data attributes, run the AI security check, and reuse your sections across all your websites.
Section Creator — coding rules & what JavaScript is allowed
Understand exactly what HTML, CSS, and JavaScript you can use in the Section Creator — including how to write interactive components like menus, accordions, and animations correctly.
Creating new pages with AI — the complete guide
How to use the AI assistant to create full pages with sections and automatic nav wiring — including model choice, credit costs, and what to expect.
AI Assistant tips and tricks — get better results faster
Practical techniques for getting the most from the AI assistant — quick prompts, the right mode for the right job, how to save credits, and what the AI can actually do.
Save as My Template — reuse sections across all pages
How to save any section as a personal template and reuse it on any page or any website — the fastest way to keep your site consistent.