
The AI Build & Edit drawer
How the AI chat works — generating new sections, redesigning existing ones, choosing models, using reference images, and understanding AI credits.
In this guide
Opening the AI drawer
Click the Build & Edit floating button in the bottom-right of the live preview. The AI drawer slides in from the right, overlapping the preview.
The drawer stays open between actions — your chat history is preserved for the entire browser session. Closing and reopening it does not clear the conversation.
Two modes: Templates and AI Chat
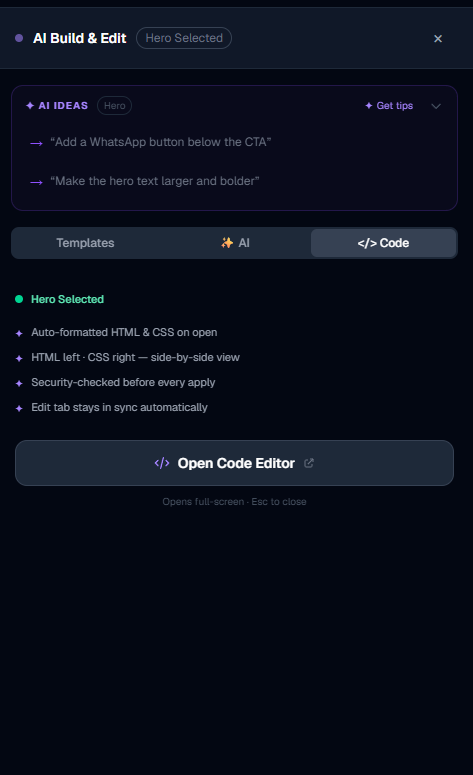
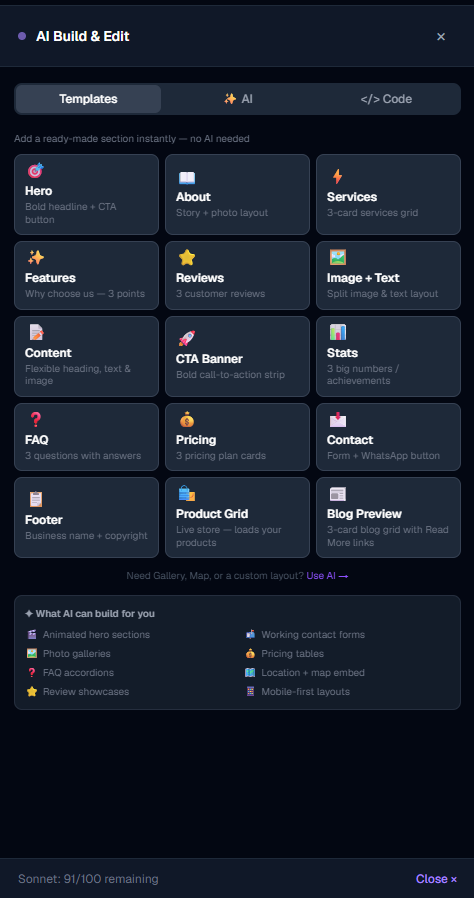
The top of the drawer shows two tabs:
Templates — a quick-pick grid of 15 common section types (Hero, Services, Reviews, FAQ, etc.) with icons. Clicking any tile opens the variant picker for that type so you can add a new section instantly without typing a prompt.
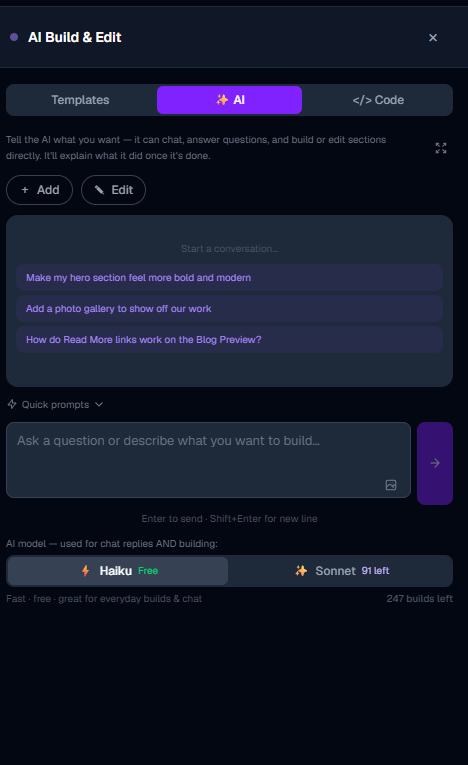
AI Chat — a full conversational interface where you describe what you want in plain English. The AI reads your message, understands your intent, and takes action.
What you can ask AI to do
The AI understands six categories of requests:
Generate — add a brand-new section:
*"Add a testimonials section with 3 reviews from happy customers"*
*"Create a pricing section with 3 plans — Basic, Pro, and Enterprise"*
Regenerate — replace a section's content while keeping the same layout. Select a section first, then:
*"Rewrite this with a more urgent tone"*
*"Change the headline to focus on speed and reliability"*
Redesign — change the visual layout and style of a section while preserving its meaning:
*"Make this look more modern — dark background, large text"*
*"Redesign this section with a grid layout instead of a list"*
Batch regenerate — regenerate multiple sections at once (see Select Mode in the sections guide).
Fix text fields — repair broken placeholder text in a section.
Fix image slots — repair broken image containers in a section.
How the AI understands your prompt
The AI always has context about your business — your business name, type, city, and tone set during onboarding. You do not need to repeat this in every prompt.
It also knows the current page structure — all section types and their IDs — so you can refer to sections by name:
*"Redesign the services section"*
*"Add a contact form after the pricing section"*
If a section is currently selected in the builder (highlighted blue border in the preview), the AI treats that as the default target for redesign/regenerate requests.
Haiku vs Sonnet — choosing your AI model
Two AI models are available:
Haiku (fast, default) — Claude Haiku. Used for all generation tasks on every plan. Fast (5–15 seconds), uses your regular generation credits. Good for building sections, adding content, and most everyday edits.
Sonnet (premium) — Claude Sonnet. More powerful — better at nuanced rewriting, brand-voice matching, and complex multi-section reasoning. Slower (15–30 seconds). Available on Starter and Pro plans, or via top-up credits on any plan.
The model selector appears as a toggle in the chat input row. Switch to Sonnet for quality-critical sections like your hero headline or About page.
Sonnet quota and top-up
Sonnet usage is tracked separately from regular Haiku builds:
Credits are weighted by task size: single generate/redesign = 1 credit; Create Pages AI = 3 credits; AI Brand Build = 4 credits.
When your Sonnet quota is exhausted, the AI automatically falls back to Haiku for that request. A small amber notice in the top bar tells you this happened: "Sonnet quota reached — used Haiku".
The drawer footer always shows your current remaining Sonnet balance. If you need more, click Buy Top-Up (10 Sonnet credits, one-time purchase via Paddle) — available on any plan.
Using a reference image
You can attach an image to your AI prompt to influence the design. Click the image/attach icon in the chat input area before sending.
Use this to:
The image is sent to Claude alongside your text prompt. It influences color choices, layout style, and image placement in the generated section.
While AI is generating
During generation, the pulsing dot in the drawer header turns yellow and the backdrop dims the preview. The drawer cannot be closed while AI is working — this prevents accidental interruption of a generation in progress.
Once generation completes, the new or updated section appears in the preview immediately. The AI also posts a short follow-up message in the chat explaining what it did.
AI generation credits (Haiku builds)
Every AI action — generate, regenerate, redesign — uses one generation credit from your plan's daily/lifetime allowance:
If you hit the daily or monthly limit, you see an upgrade prompt. Credits reset on your billing date (monthly plans) or never reset (free plan lifetime limit).
More in Builder
Builder layout and the top bar
Understand the full builder layout — the three panels, every top-bar button, the save system, and how to navigate pages.
Managing sections — add, reorder, duplicate, delete
Everything about sections: what they are, how to add them in the right position, reorder by dragging, duplicate, delete, and change their visual style.
Editing content — the Edit tab
How to edit text, buttons, links, colors, images, icons, and every other field in the content editor.
Media library, logo, fonts, and hero images
How to upload images and logos to the media library, set your site logo, choose fonts, and set a hero background image or video.
Power features — select mode, batch redesign, templates, shortcuts
Advanced builder techniques: select multiple sections for batch AI redesign, save custom section templates, use keyboard shortcuts, and apply full-site templates.
Managing pages in your website
How to add new pages, switch between pages, navigate internal links, and delete pages you no longer need.
Using templates smartly — get more with fewer AI credits
How to build a complete, professional website using ready-made templates without spending any AI credits — then use AI only where it matters most.
Empty Section — build any custom layout with AI or your own code
How to add a blank empty section to your page and use the AI drawer or Code Editor to turn it into any layout you can imagine — no templates, no limits.
Section Creator — build and save custom HTML/CSS sections
How to write your own HTML and CSS in the Section Creator, add editable fields with data attributes, run the AI security check, and reuse your sections across all your websites.
Section Creator — coding rules & what JavaScript is allowed
Understand exactly what HTML, CSS, and JavaScript you can use in the Section Creator — including how to write interactive components like menus, accordions, and animations correctly.
Creating new pages with AI — the complete guide
How to use the AI assistant to create full pages with sections and automatic nav wiring — including model choice, credit costs, and what to expect.
AI Assistant tips and tricks — get better results faster
Practical techniques for getting the most from the AI assistant — quick prompts, the right mode for the right job, how to save credits, and what the AI can actually do.
Save as My Template — reuse sections across all pages
How to save any section as a personal template and reuse it on any page or any website — the fastest way to keep your site consistent.